Brugergrænseflade
Nedenfor findes alle de oplysninger du har brug for, for at kunne navigere rundt i Grepolis.
Brugergrænsefladen
Tryk på et af billeder for at få mere information om det specifikke område:
  |
 | |
 |
Som du kan se fra billedet foroven er det meste af skærmen fokuseret på kortoversigten. Gennem sidebaren og den øvre bar, i toppen af skærmen, kan en spiller få adgang til al den information, der er behov for, for at spille spillet.
Skærmen er delt op i tre forskellige toolbars.
- Den vestre sidebar er det sted, hvor en spiller er i stand til at tilgå mange nøglefunktioner, såsom allianceforummet, rapporter og ranglisterne. Du vil også finde minikortet, hvilke rådgivere der er aktive og spillets ur.
- Den højre sidebar indeholder hvilken gud, der er bliver tilbedt, hvilke enheder, der er tilstede og din rapporter.
- Den øvre toolbar viser byens navn, angrebsnotificationer, knapper der kan skifte mellem byer, bevægelsesindikatorer og byens råstoffer (og hvis forvalteren er aktiveret, vil en genvejsbjælke også vises).
Det er muligt at zoome ind og ud, mens du ser på denne oversigt.
Venstre side
Her vil du finde informationer om alle knapperne på den venstre side af skærmen.
Øvre del
Denne del er primært optaget af et kort og dets funktioner. Du kan dog også finde din guldmængde her. Der er mere information i tabellen forneden:
| Ikon | Navn | Beskrivelse |
|---|---|---|
| Strategikort | Tryk på dette ikon for at se strategikortet. Dette lader dig nemt se øerne omkring dig. | |
| Øoverblik | Tryk på dette ikon for at fokusere på en ø. Dette er standardvisningen for kortet. | |
| Byvisning | Tryk her for at åbne din byoversigt. Herfra kan du sætte bygninger i kø og træne enheder. | |
| "Spring til aktuelle by | Tryk her for at gå til din nuværende by. | |
| Farvetildeling | Tryk her for at åbne farvetildelingen. Denne viser hvilke alliancer og spillere du har tildelt farver til. | |
| Gem sted | Tryk på denne knap, hvis du ønsker at gemme denne placering på kortet. Placering vil herefter blive gemt og vist i en menu næste gang, så du nemt kan gå dertil igen senere. | |
| Spring til disse koordinater | Dette tillader dig at gå direkte til de indtastede koordinater. | |
| Premiumikon | Tryk på denne for at åbne betalingsvinduet. |
Du vil også finde informationer om rådgiverne og tiden i spillet:
Under minikortet kan der ses hvilke rådgivere der er aktive. Hvis portrættet er gråt vil rådgiveren ikke være aktiv. Ved at trykke på en billederne vil premium vinduet åbne. Dette vil tillade spillere at vælge hvilken rådgiver der ønskes aktiveret eller om der ønskes at forlænge en rådgiver.

Uret er automatisk sat til GMT+1 (UTC+1), hvilket er den tidszone serverne er placeret i. I indstillingerne kan du ændre tidzonen.
Nedre del
Den nedre del af menuen er nøglefunktionerne i spillet. Herfra er du i stand til at få adgang til beskeder, alliancens forum og ranglisterne.
| Ikon | Navn | Beskrivelse |
|---|---|---|
| Meddelelser | Ved at trykke på dette ikon vil du åbne for dine beskeder. Du kan også starte nye samtaler herfra, med individueller personer eller en gruppe. Du er også i stand til at se alle dine gamle beskeder. Du kan også blokere spillere, som du ikke ønsker beskeder fra. Det er også her, at annonceringer fra Grepolis Teamet kan ses. | |
| Rapporter | Dette ikon åbner op for rapporterne. Du modtager rapporter fra ting som angreb (både angreb, som du selv har startet og angreb rettet mod dine byer), støtte, magier og når guld bliver krediteret. Du kan selv vælge hvilke rapporter du ønsker at modtage, såvel som at indstille animerede kamprapporter. | |
| Alliance | Dette åbner op for allianceoversigten. Hvis du ikke er medlem af en alliance vil du kunne se allianceinvitationer her, såvel som muligheden for at starte din egen alliance. Læs alliance sektionen for mere information. Hvis du er medlem af en alliance vil det første vindue vise interne annonceringer fra alliancens ledere, såvel som en liste over alliancens events (nye spillere, erobringer osv). Hvis du er en leder, så er det her, du skal ændre alliancens indstillinger (navn, banner, profil, osv.). Hvis du derimod kun er normalt medlem vil du kunne se en liste over alliancemedlemmer såvel som alliancens pagter. | |
| Allianceforum | Tryk her for at åbne alliancens forum, hvor du er i stand til at snakke med din alliance. Hvis du ikke er medlem af en alliance vil denne knap være grå og du vil ikke være i stand til at trykke på denne. | |
| Rangliste | Denne knap åbner op for verdenens rangliste. Du kan se følgende: Spillere Alliancer Bedste angribere/forsvarer Verdens vidundere | |
| Profil | Her er du i stand til at ændre din spilprofil. Du kan også vise dit eget profilbillede her. | |
| Invitér venner | Inviter dine venner til at spiller Grepolis! De vil komme op på din ø (eller en i nærheden). Hvis det er nye spillere vil du modtage 200 guld, når du kommer op på 1000 point. | |
| Chat | Denne knap åbner op for et lille chat vindue. Du kan snakke med medlemmerne fra din alliance, der er online. Dette er brugbart, når der skal snakkes sammen og koordineres angreb. | |
| Forum | Dette er et link til det offentlige Grepolis Forum. Snak med medlemmerne af fællesskabet, der måske ikke spiller på den samme verden som dig. Her kan der spørger om ting, foreslås ting og snakke om alt muligt. |
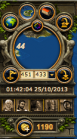
Øvre bar
Denne toolbar giver spilleren forskellig informationer gennem brugen af ikoner. En spiller vil se navnet på den nuværende by, indkommende angreb, hvor mange handler der er i gang og hvilke råstoffer, der er i byen.
Denne er placeret i midten af skærmen. Mange spillere har tildens til at vælge en tema til deres bynavne og andre har et system, der tillader dem at vide, hvilke byer der har visse opsætninger. Ved at dobbeltklikke på navnet vil du være i stand til at omdøbe din bys navn. Et enkelt tryk på og bylisten vil komme frem og tillader dig, at vælge en by hurtigt.
Pilene på hver side af navnet tillader dig at gå igennem dine byer en efter en.
Andre knapper
| Ikon | Navn | Beskrivelse |
|---|---|---|
| Note ikon | Dette ikon vil åbne op for noteboges, hvor du kan skrive og gemme beskeder. Dette er dog en premium funktion, som kræver, at du har forvalteren aktiveret. | |
| Inventar | Tryk her for at åbne inventaret. Du er i stand til at gemme belønninger fra øopgaver og specielle event for at kunne bruge belønningerne, når du har lyst. Se også inventarsiden for flere informationer. | |
| Forskellige oversigter | Denne knap vil åbne op for forskellige oversigter. Du skal dog have forvalteren aktiveret, for at kunne se disse menuer. De giver informationer om alle dine byer og gør det nemmere at håndtere et stort antal byer. | |
| Enhedsrekruttering | Denne vil give dig informationer om hvor mange enheder, der er ved at blive rekrutteret. | |
| Enhedsbevægelser | Denne vil give dig informationer om dine enhedsbevægelser. | |
| Handelsbevægelser | Denne giver dig informationer om din handelsbevægelser. | |
| Angreb | ||
| Ingen angreb. | Dette er standardudgaven af ikonet. | |
| Indkommende angreb | Når du har et angreb indkommende på en af dine byer vil ikonet blive som dette. Det vil også vise hvor mange angreb, der er på vej. | |
| Angrebsnotifikationer | Når du bliver angrebet er det ikke kun ikonet, der vil vise dette, men du vil også modtage en notifikation i bunden af højre side. | |
Råstoffer
Dette viser hvor mange råstoffer du har gemt i dit lager. Denne vil dog også vise, hvor stor en befolkning du har tilgængelig.
Genvejsbjælke
Genvejsbjælken kan findes under menuen i toppen. Det er dog en premiumfunktioner, der kun er aktiveret, hvis forvalteren er.
Du vil være i stand til at tilføje links til bygninger, for hurtigere at få adgang til disse.
For at redigere i den bjælke tryk da på den lille møtrik i venstre side. Tryk på "Nyt menupunkt" og indtast da navnet, som du ønsker vist og javescript koden til bygningen. Koderne kan findes i denne tabel:
| Navn | Kode |
|---|---|
| Senat | javascript: MainWindowFactory.openMainWindow () |
| Hule | javascript: HideWindowFactory.openHideWindow () |
| Lager | javascript: BuildingWindowFactory.open ('storage') |
| Bondegård | javascript: FarmWindowFactory.openFarmWindow () |
| Skovhugger | javascript: LumberWindowFactory.openLumberWindow () |
| Stenbrud | javascript: StonerWindowFactory.openStonerWindow () |
| Sølvmine | javascript: IronerWindowFactory.openIronerWindow () |
| Markedsplads | javascript: MarketWindowFactory.openMarketWindow () |
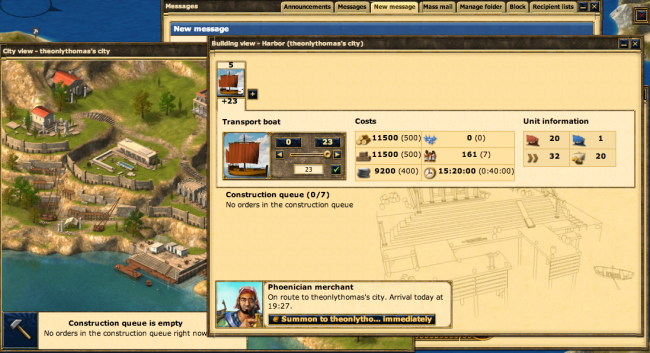
| Havn | javascript: DocksWindowFactory.openDocksWindow () |
| Kaserne | javascript: BarracksWindowFactory.openBarracksWindow () |
| Mur | javascript: BuildingWindowFactory.open ('wall') |
| Akademi | javascript: AcademyWindowFactory.openAcademyWindow () |
| Tempel | javascript: TempleWindowFactory.openTempleWindow () |
| Agora (forsvar) | PlaceWindowFactory.openPlaceWindow ('index', open) |
| Enheder udenfor | PlaceWindowFactory.openPlaceWindow ('units_beyond', open) |
| Simulator | PlaceWindowFactory.openPlaceWindow ('simulator', open) |
| Kultur | PlaceWindowFactory.openPlaceWindow ('culture', open) |
| Fønikiske Handler | javascript:Layout.phoenicianSalesman.open() |
Right Bar
The right sidebar provides information about the god currently being worshipped in the city, a count of the total troops in the city and in the future, your Heroes control panel.
Buttons
There are a number of buttons at the top of the right menu bar, details on these can be fund below:
| Image | Name | Description |
|---|---|---|
| Settings Button | The settings page, customise things such as how many windows you can have open, whether or not the Night Graphics are enabled and change your password (you can obviously change many other settings though!) You are also able to submit support tickets from here. | |
| Sounds Button | Click here to open the settings for the Sounds. | |
| Wiki Button | A link to here! | |
| Log Off | Log off your current world. | |
| Spells Button | Opens a menu from which you will be able to cast spells (if you have enough favour). |
God and Favour

The upper right corner of the sidebar gives a portrait of the god being worshipped in the selected city. The amount of favor a player has will be given under the portrait.
By clicking on the image of the lightening bolt, you will be shown a list of the spells that can be cast on that city. All spells for all gods being worshipped will be available. You will only be able to cast spells if you have enough favor.
Units
Underneath the portrait of the worshipped god, is displayed the troop indicator. Troops shown here are also inclusive of support troops currently stationed in the city. There are also links to the barracks and harbour.
Notifications
You are provided with a constant stream of Notifications on the right hand side of your map. You get notified about many things here, these are:
- Building-work completion
- Trade
- Divine Powers
- Messages
- Reports
- Attack planner warnings
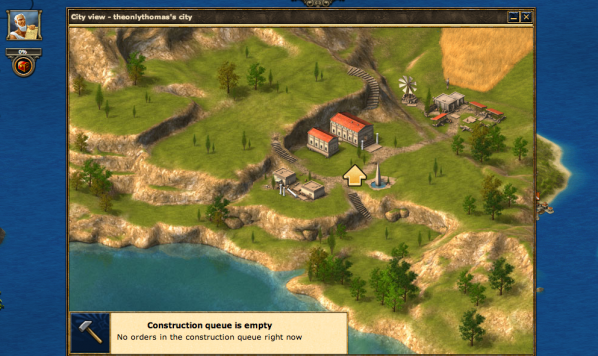
Main Screen
The main bulk of your screen is the play-area. When all windows are closed, you will see your island, you can click and drag to navigate around the world (or switch to the World View to make it a bit easier). It is in this view that you are able to interact with other players as well as NPC Farming Villages.
 |
When you click to open a window, it will open like a pop up. You are able to have up to 10 windows open at once (you can control this limit in the Setting menu) and can click and drag to move them around. Clicking the red 'X' in the top right of this area will close all of the windows.
 |
Map Details
There are a number of details which appear on the map, most of which are specific to the island on which your city is located.
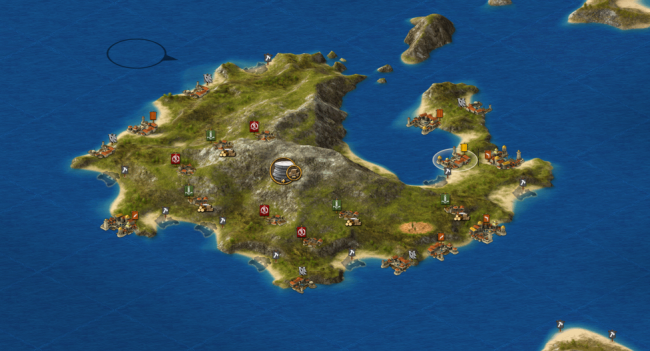
Island Details
In the center of each island, there is an icon which describes the fertility of the island's resources. There will be one resource which is more abundant than the others, and one resource which is more scarce than the others. Adapting your build strategy to these changes in resources will help to improve your ability to get your city up to speed quickly.
- For instance, if you have a +silver and -wood island, having Poseidon as your worshipped god and taking over the villages which trade for wood will be helpful in the early stages of the game.
| Icon | More | Less |
|---|---|---|
| Wood | Stone | |
| Wood | Silver | |
| Stone | Wood | |
| Stone | Silver | |
| Silver | Wood | |
| Silver | Stone |
City Details
| Image | Description |
|---|---|

|
This is one of your cities. |

|
This city belongs to a member of your alliance. |

|
This city belongs to a member of an alliance which has a pact with your alliance. |

|
This city is owned by a member of an enemy alliance. |

|
The owner of this city is not part of any alliance or their alliance has no relations with you. |

|
This is an abandoned city and belongs to no one. It will shrink daily until it disappears completely. |
- It is also possible to assign colors to players and/or alliances so that only you see them in this new color. You can do this by clicking on a city, select Info and next to the player's name/alliance there is a little colored box. It is there that you can select a new color for them.
Like the way in which your buildings change and evolve, so too will your city on the map. As you increase in points, the city will grow larger and appear more grand in comparison to other cities.
| City Expansion | ||||
|---|---|---|---|---|

|

|

|

|

|
| 0-599 points | 600-2,399 points | 2,400-5,399 points | 5,400-9,999 points | 10,000+ points |
City Options
When you click on a city controlled by another player, you will be given 7 options to chose from. These options include peaceful actions, and hostile actions.
- Note: Abandoned cities will only allow you 5 of these options.
In the left hand column in the table below you will see two menus. The one on the top is the menu that you are presented with when you click on another player's city, the one on the bottom is the menu you are presented with when you click on one of your own cities.
| Menus | Option | Description |
|---|---|---|
|

|
Provides information about the current owner and alliance of the city. |

|
Opens the City Overview of the city. This replaces the Info Button if you control the city. | |

|
This allows you send troops and/or ships to help another player defend their city. | |
| Fil:AttackButton.png | This will open up the attack window and allow you to determin what troops to send when attacking the city. | |
|
|

|
When you have a market built you will be able to trade with other cities. Not available for Ghosts. |
| Fil:SpellButton.png | Once you have a temple built you can enact spells provided you have enough favor. Not available for Ghosts. | |

|
After you have built a cave you can use this to send spies provided you have enough silver. | |
| Fil:GoTo.png | This will center the map over the city you are looking at. |
Clicking on an empty anchor spot on the map will present you with two options:
| Button | Description |
|---|---|
| Click here to open the colonisation menu, from here you are able to send a Colony Ship to Colonise the empty anchor point. | |

|
Click here to invite friends who do not already play in your world. If they are not already playing other worlds, and so are completely new players, you will be rewarded with 200 gold if they reach 1000 points. |
The island view is easily moved and you can drag and drop it to get a better view. It allows you to move your map around to see neighbouring islands. It is quite easy to use as long as the distances are not too great.
World Map
The world is divided into 100 oceans in a grid layout, and each ocean is numbered from 0-99. The number of the ocean correspond to the (X,Y) location in the world. The first number is the beginning of the X coordinate, and the second number is the start of the Y coordinate.
In addition to the oceans, the world can be divided into 4 quadrants which correspond to the ordinal directions on a compass. They are in clockwise order: NE (Blue), SE (Purple), SW (Green), and NW (Red). The direction in which you choose when you join the game will impact on what alliances are located near you.
The world can also be divided into regions: Core Oceans, Expansion Oceans, and The Rim. Many players agree that the Core is made up of Oceans 44, 45, 54, and 55 as they are located in the exact center of the world. The Expansion Oceans are those which surround the Core. The exact number of these oceans depends on the world and how active it is. Beyond the Expansion Oceans is The Rim. New players and those players who have lost all of their cities or restarted will be found here. As more players join or others are conquered, The Rim moves further out towards the edges of the world.