Guide Portal Guide 17: Forskelle mellem versioner
Pernall (diskussion | bidrag) |
Pernall (diskussion | bidrag) |
||
| Linje 16: | Linje 16: | ||
Så lad os komme i gang. | Så lad os komme i gang. | ||
= | =Del 1: Sætte angrebsplanlæggeren op= | ||
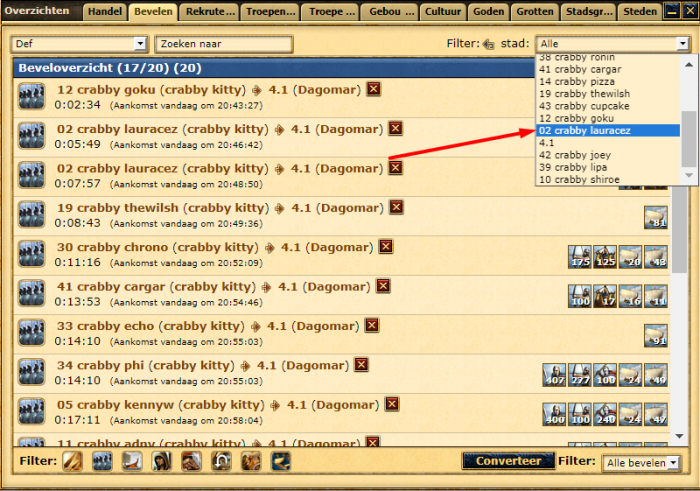
Først og fremmest, så skal vi tilføje alle vore angreb og støtte til planlæggeren. | |||
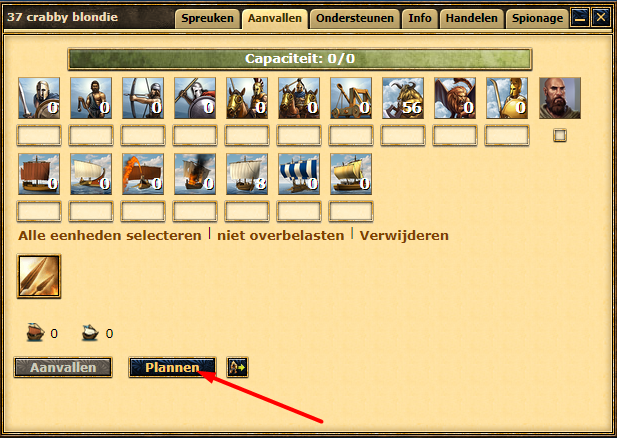
*Åben et angrebs eller støtte (hjælp) vindue til byen du vil time til og klik på "planlæg" for at åbne angrebsplanlæggeren med den by sat som mål. | |||
[[Fil:Guide_Portal_17_001.png|center|700 px|link=]] | [[Fil:Guide_Portal_17_001.png|center|700 px|link=]] | ||
Versionen fra 21. apr. 2020, 13:04
Credit for denne guide går til : fluvisol
Introduktion
Eftersom folk har spurgt mig hvordan jeg bruger angrebsplanlæggeren til at time, så tænkte jeg at jeg ville skrive en lille guide omkring det.
Jeg ved der er en anden guide om angrebsplanlæggeren her, men billederne er ikke længere tilgængelige og den dækker ikke over delen med at time (selvom det ikke er svært at regne ud).
Denne guide kan blive brugt til både Koloniskib snipe og til at time til et Koloniskib..
Tak til hvem end der besluttede at give os muligheden for at fjerne advarsel når man angriber alliance medlemmer. Du bør virkelig slå dette fra hvis du timer angreb på dem, siden hver gang du prøver at sende enheder så vil den have du skal bekræfte igen. (Du finder den under instillinger)
Alle billederne er på hollandsk, siden jeg har mere end 5 byer der og jeg er ret ligeglad med at folk ved hvad der er i mine byer. :)
Så lad os komme i gang.
Del 1: Sætte angrebsplanlæggeren op
Først og fremmest, så skal vi tilføje alle vore angreb og støtte til planlæggeren.
- Åben et angrebs eller støtte (hjælp) vindue til byen du vil time til og klik på "planlæg" for at åbne angrebsplanlæggeren med den by sat som mål.
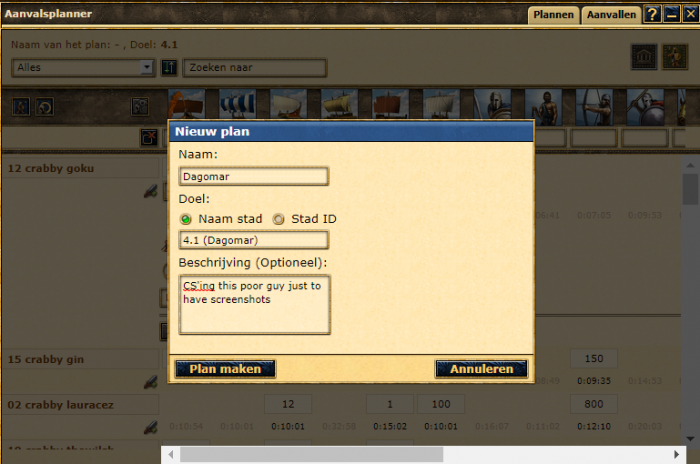
- Create a plan to the city or use an old plan.
Personally I always have a plan that I use for everything and gradually delete stuff from, more on that later. You need to fill in the target city as well, this is done the same as you would normally insert a bb code
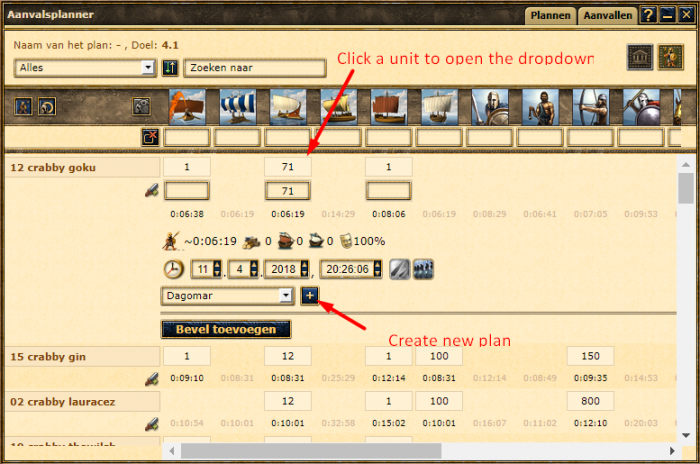
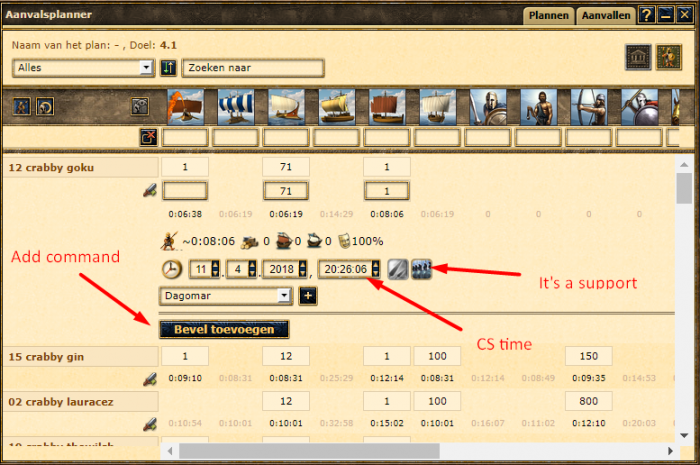
- Fill in all the attacks and supports with the right time.
Make sure to click the support button if they are support Don't forget to click add command
Part 2: Timing
Now begins the fun part
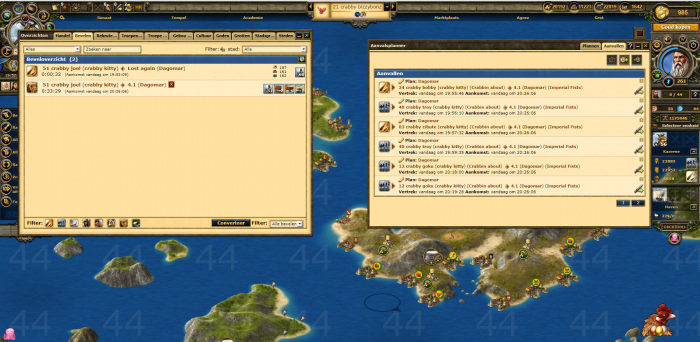
- Set up your screen as in the image below
This way we can easily see the landing time, cancel if we want and fill in the troops again
- Wait for the attack planner notification and click it
This shows up 1 minute before the command needs to be sent. If you're still timing a previous command, finish that one first, the notifications will show up in order of sending Clicking it highlights the command in the attack planner and takes you to the right page, making it easier to resend if the first try is not satisfactory

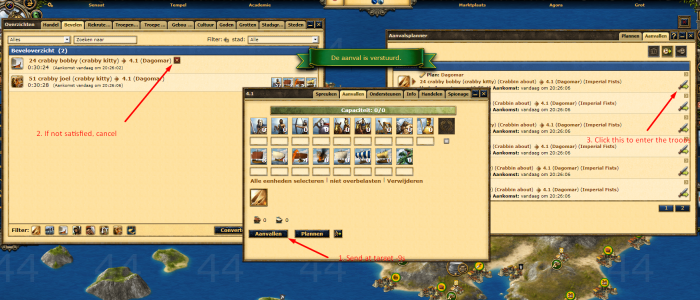
- Time the command
First, you click the sword at the far right of the planner. This will open a command screen and fill in all the troops you entered for that command Then, you wait until the arrival time on the command is target -9s and click send Now watch the command overview and check if the time is good enough for you If not, cancel the command and go back to the first step of Time the command You can repeat this until the arrival time is 11 seconds over your target, after that you won't be able to get the target anymore
Part 3: Tips and Tricks
Of course as with everything, there are little things you can do to make timing go more smoothly
a) The planner
The planner has a few features you can use From the first three numbers in the screenshot below:
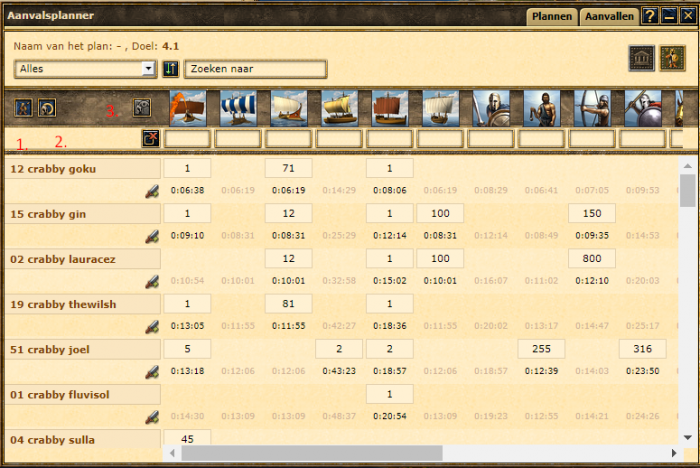
1. If this button is activated it will include units that are currently not in the city to the amounts in the planner. This can be useful for planning stuff ahead of time but personally I always turn it off. If you have for example 5 biremes out as trips in a city but accidentally plan them in the support, you will get the "Not enough units in the city" error message when trying to send This button is on by default so be careful
2. If this button is activated it will include units that are currently in other planned attacks. Personally I keep this on because I use a lot of anchors meaning units will be in multiple planned attacks. It can be useful however if you're splitting up troops and want to know how many you have left, for example sending 160 slingers with a CS and wanting to time the remaining 1440 ones in a 1600 slinger nuke. This button is on by default
3. This button will add back all removed troop types. Since by default all troop types are there it's greyed out To remove troop types, hover over their icon and click the red x. This will remove the column from the planner for the time being, which is useful if like me you build a lot of archer/chariot cities seeing as chariots are not actually on the screen until you scroll right
4. The input fields under the troops. I think these let you filter between cities that have a minimum amount of the troops that you put in, but it can only go up to 100 which doesn't make much sense. I thought it might've been percentage based because of this but it doesn't seem to be, feel free to tell me below The button to the left of them removes all input
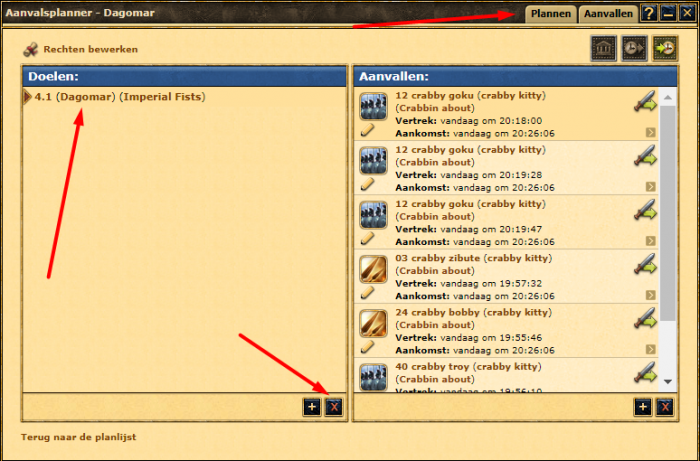
5. Removing cities from plans Just open the planner, click "Plans", click the plan, select the city and click the delete button. Same way for attacks
b) The command overview
When timing from a lot of cities or even just being CS'd somewhere, the command overview can get so cluttered it's hard to quickly find your command you just sent A trick for this is to send any unit as support from a city to the city you're timing from. After that you filter the overview to just that city, meaning only commands to and from the city you're timing from will be on the overview Don't forget to switch between filters if you switch between cities This also works if you get someone else to send small supports to your cities For this purpose I usually have a city that doesn't participate in the plan, that way you don't miss out on any units
c) General tips
1. Always use anchors to time. An anchor is a slower unit to make the entire attack/support slower (such as a slow transport for a defense nuke). That way if you don't get the desired timing in the small 18 second window you have per command, you can try again later with the same troops but without the anchor.
List of anchors I always build: LS city: 1 slow transport Myth city: 1 slow transport, 1 LS, 1 fast transport Defense city: 1 slow transport, 1 LS, 1 fast transport
If you have a horse nuke on an island somewhere it can get kind of ridiculous 1 catapult, 1 cerberus, 1 hoplite, 1 sword, 1 erinys, 1 archer, 1 slinger, 1 chariot That is 8 tries if someone tries to CS a city on the island, and 16 if you have Atlanta in the city. Considering I can send recall up to 7 times per anchor that would be 112 tries, one of them is bound to be exactly on the CS time So you see why you should always build anchors in the city
2. Clear your browser cache Having a full browser cache can cause weird things such as your in game windows closing when you send an attack or support, which we definitely don't want. Check my sniping guide for more on similar things
Part 4: Have fun
Well that's the end of this I think I will add more things if I think of them, as with the snipe guide these things have become an automatism for me so I don't realize I do certain things Have fun with it!
Edit: Fun fact about this, the joke CS I sent just to make this guide landed and apparently the city has a lvl 20 wall :)
Denne guide er taget fra engelsk forum, skrevet af fluvisol og oversat af Grepolis team DK